A stellar ocean: Creating a gradient skybox with distant stars in Unity's Shader Graph
I have to confess something: until I started building Spacefreighter, I had no idea how important a game's skybox really was. For most games, the skybox is nothing more than a distant backdrop, and seldom something we think about. But the skybox is actually critically important to a game for three reasons:
- It defines the game's setting. Night, space, a sunny day on the beach ... the skybox plays a massive role in creating the immersive scene you seek for your players.
- It defines the game's art style. Is it toony? Dreary? Colorful? The style you pick for the skybox influences how the player's understands the visual rules of your world. If the skybox violates these rules (for example, if it's too detailed), the player will feel far less immersed.
- It defines the ambient light. Ambient light should match the lighting of the sky itself. If you have a dark skybox but need a yellow ambient light, for example, your world will look less real. Not ideal.
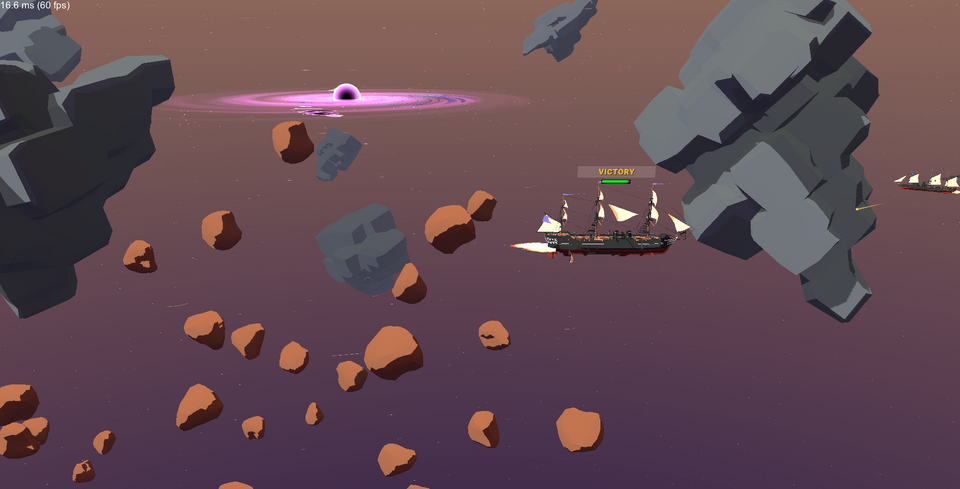
Ok, I've convinced you the skybox is important! Now it's time to show you how to make a great one. In this example, I'm going to show you how to make a gradient skybox with far-off stars using Unity's Shader Graph. Here's the effect we're going to make:
(Black hole not included... a future write-up is coming on that.)
Specs and setup
I'm running Unity 2021.1.13f1 and using URP. That should be all you need to pull this off.
Step 1: Creating the gradient effect
Open Unity and create a new material. I named mine Custom Skybox. Then, create a new shader by going up to the top bar and choosing Assets > Create > Shader > Universal Render Pipeline > Unlit Shader. Shader Graph will open.
Here's what the completed graph for this chunk will look like - refer back to here if you get lost.
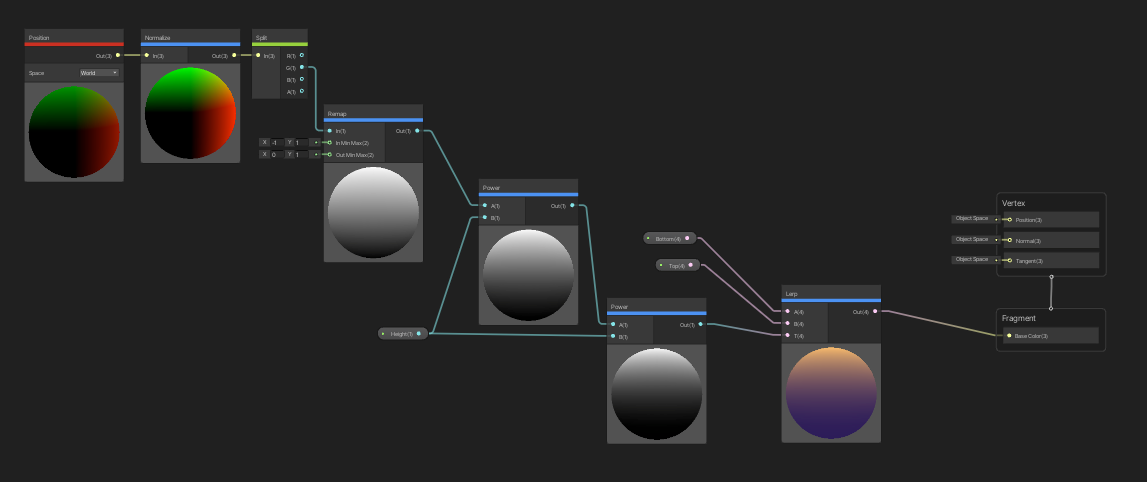
Our first task is to create the color gradient that will be the background of the skybox. We'll want to blend two colors, a top color and a bottom color, in a gradient based on their height, or y-position.
To do this, we'll start with a Position node. Right-click in the shader graph working area and hit Create Node > Position node. Make sure the "Space" field is set to "World" since we want the world height for our blending calculation.
We then need to normalize the position, essentially remapping the height values from raw numbers to a range between -1 and 1, with -1 being the bottom of the skybox and 1 being the top. Our blending will then be much easier to figure out. So add a Normalize node and feed the output of the Position node into it.
We only want the y-value of position (for height), which corresponds to the "G" channel of position in shader graph. So, next, add a Split node off of the Normalize output.
Finally, let's work with only positive values for height, to reduce the chance we screw up with weird negatives. Add a Remap node and, grabbing a line only off the "G" value of the Split node, hook it up. Set the "In Min Max" to x = -1 and y = 1, and set the "Out Min Max" to x = 0, y = 1. Now our heights are positive values between 0 and 1.
If we want to manually adjust the height of the gradient, we should create a property we can use to control it in the inspector. To do so, let's feed the Remap output into a Power node as the "A" input value (so, create a Power node and hook it up!). For "B," we need to create a "Height" input that we can access in the inspector later on in the scene view. Click on the Blackboard > "+" to add a new property. Make this one a float called Height and drag it into the working area. Then connect it up to the "B" input of the Power node.
For me, this effect wasn't quite strong enough, so I then feed the output of this power node into another Power node, with the height property plugged into it again. Up to you if you want to do the same - not required.
Lastly, we need to create a smooth gradient between the two colors. Create two additional properties - not floats this time, but Colors. Name one Top and one Bottom, and drag them both into the scene. Set some default values too. I used
We will need to Lerp these values by a control value that corresponds with our height.
Lerp interpolates between the pointsaandbby the interpolantt. The parametertis clamped to the range [0, 1]. This is most commonly used to find a point some fraction of the way along a line between two endpoints (e.g. to move an object gradually between those points).
Create a Lerp node and plug in the two Color properties (Bottom corresponds with A and Top with B, weirdly!), then plug the result of our Power node into T. Plug this into the fragment base color and SAVE YOUR ASSET (if you don't, your changes will not be reflected in the scene or game views).
We now have a gradient!
..BUT you're also going to need to assign the Custom Skybox shader to a material, and then make that the Skybox. So make a material (Assets > Create > Material) and call it something like Custom Skybox. Then assign it our Custom Skybox shader, and lastly, make sure to open the Lighting tab (under the Environment section) and drag our material into the Skybox slot. For the material, set the variables as you wish in the inspector.
My settings: for Bottom, I'm using #2C1C59 and for Top, I'm using #FFC06D. I like x=1.1 for the Height property.
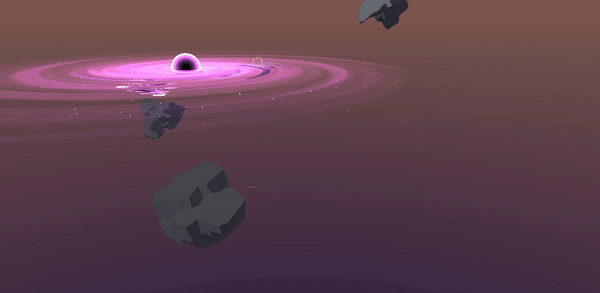
Here's what we have so far:
Step 2: Creating the distant stars
Now it's time for the fun part: adding stars. As before, our full final graph, including the work we did above, is shown below in case you get lost.
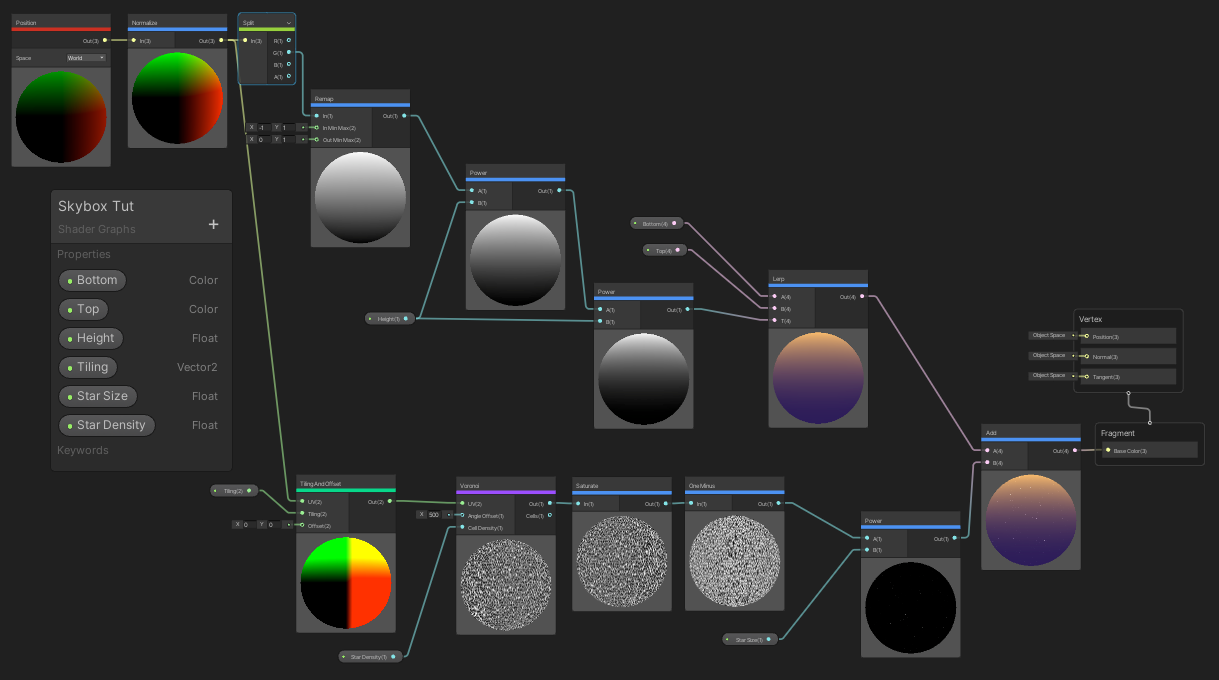
Our basic plan for making stars is to use Voronoi noise patterns to generate some noisy cells with nuclei that we can then turn into stars. These semi-random cell patterns will also generate cells of different sizes, so the stars will appear to be different sizes in the background.
First, we'll need to set up tiling so our pattern can be repeated all around the skybox (this is subtle and not noticeable with the correct setup). So right-click and make a Tiling and Offset node, and map the "UV" input by taking a second line off the Normalize node we used earlier. Refer to the image above if you need help.
The Tiling and Offset node also takes a Vector 2 input for the X and Y tiling amounts. Create a new property of type Vector 2 in the Blackboard called Tiling and then feed it into the Tiling node's "Tiling" input. I set my default values for this as x = 8, y =2. You can leave the "Offset" input values at (0,0).
Now it's time for the Voronoi noise. Feed the line from the Tiling and Offset node output into a new Voronoi node.
Voronoi noise is generated by calculating distances between a pixel and a lattice of points. By offsetting these points by a pseudo-random number, controlled by input Angle Offset, a cluster of cells can be generated. The scale of these cells, and the resulting noise, is controlled by input Cell Density. The output Cells contain the raw cell data.
We'll need to choose a value for Angle Offset to get a sufficiently random cell pattern. I choose to set X=500 for my example but play around with this value if you'd like to see how it impacts the randomness of the layout. We'll also want to make the "Cell Density" value controllable via a property. Make float property called Star Density and hook it into that input. As you'd expect, playing with this value changes the density of the cells and thus the stars. I made my default value 10.
Go ahead and add a Saturate node as the next step, and connect it up using the "Out" value of the Voronoi node. This just clamps the Voronoi values between 0 and 1, which is nicer.
Feed the Saturate output into a One Minus node. This will create a bunch of white cell "nuclei" with black space around them, rather than the other way around. And that is how we will make stars!
Hook the One Minus output up to a Power node (input A), and create a float property called Star Size for input B. This will control the size of the stars. A value of 200 worked well for me.
Finally, combine this branch with the gradient branch by inserting an Add node that combines the output of the Lerp node from the gradient chunk (completed in step one) and the Power node we just used to create the starfield. Use the result of this Add node to feed the Base Color of the shader. As you may have guessed, our two chunks are added together, and we have a starfield! Save your asset and reload the scene to admire your hard work.
You should also watch the video below to see the skybox in action:
Questions? Comments? Ideas for future tutorials?
If you need help, or just want to talk more about the tutorial, head on over to the Spacefreighter discord and shoot me a message. I would be glad to help you troubleshoot your problem 🤓 - and of course, stick around to see more development of the game. I also do "office hours" twice a month in our Discord's voice chat to talk about the game, technical stuff like this tutorial, and to answer other questions. Hope to see you there.